The color calculator is used to freely convert among many different device-independent color spaces, including standard CIE representations (XYZ, xyY, Lab, LCHab, Luv and LCHuv), Adobe Photoshop working RGB spaces and correlated color temperature.
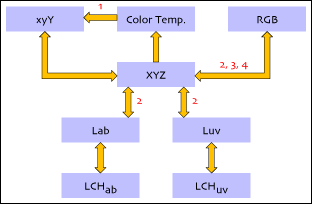
The idea is to enter a source color into its corresponding row, and then click that row button. All of the other representations are immediately calculated. The internal flow of information used to achieve the conversions is shown here:

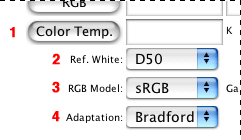
So wherever the source color is, the others may be reached by finding paths along the arrows. The numbers shown by some of the arrows are explained here:
To better understand how the calculator works, let's consider a simple example. Suppose we enter a middle visual gray like this:
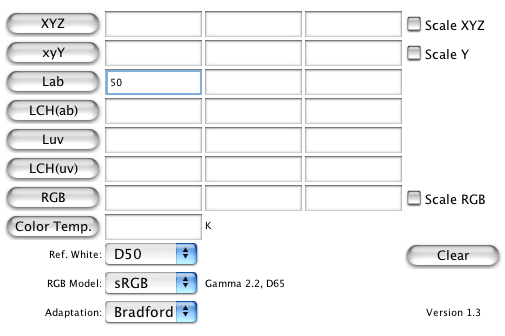
First of all, note that when entering a color, its components should be entered in the same order that they appear on the button. For example, when entering an Lab color, the L* value goes into the first column of the Lab row, the a* value goes into the second column, and b* goes into the third column. As a shortcut, a blank field is interpreted as a zero, which you will find to be a very convenient feature. So in the diagram above, a middle gray may be entered with just a 50 in the first column. Leaving the other two columns empty will mean the a* and b* components are zero, designating a neutral.
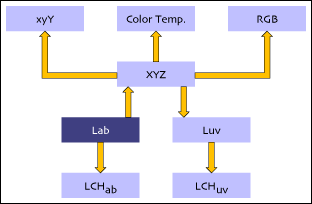
When the Lab button is clicked, the other colors are computed according to this flow diagram:
The other colors are immediately displayed:
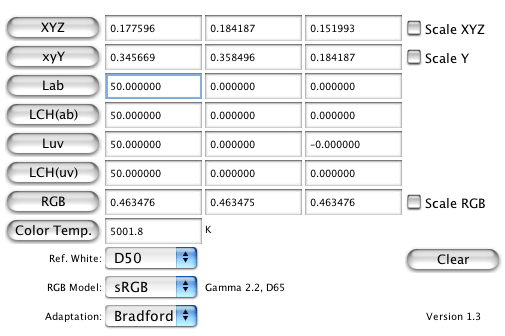
The Color Temp button refers to the correlated color temperature, and deserves a little more attention. When converting to color temperature, there are many different colors that map onto the same color temperature. Robertson's method has been implemented to perform this conversion, and if the color temperature field is blank after doing a calculation, that means the color was out of the range that Robertson's method supports. When converting from color temperature, the standard CIE method used is only valid for color temperatures in the range [4000K, 25000K]. Attempting to convert a color temperature that is outside this range will cause all other fields to erase.
The Ref. White pop-up menu is used to change the reference white interpretation of the CIE color system.
The RGB Model pop-up menu is used to change the colorimetric interpretation of the RGB color values. Included in this list are all of the RGB working spaces that ship with Adobe Photoshop, as well as several others that have emerged as a result of research efforts of various individuals (details here).
The Adaptation pop-up menu is used to select the chromatic adaptation method to use for matching the reference white of the selected RGB model (which is displayed to the right of the model) with the selected CIE reference white. If the reference white of the RGB model matches that of the CIE system, no adaptation is needed, and so the choice of adaptation method has no effect. Also note that for neutral colors, Bradford, von Kries and XYZ Scaling all produce identical results.
Note: Changing any of the values in the pop-up menus may invalidate the current values shown for all of the colors. In this case, a small reminder note is displayed above the Clear button showing that one of the main color buttons should be clicked to bring things up-to-date. Which button to click depends on what problem you are working -- there are many very useful ways to explore color transformations with different settings, and since there is no single update method, an automatic update is not performed.
The Clear button clears all of the color fields. This is useful, especially if you remember that blank fields are interpreted as zero.
The Scale checkboxes that appear at the right may be used to accommodate common alternative numbering conventions. XYZ values (and the Y component of xyY) are sometimes represented in the nominal range of [0.0, 1.0], and other times in the range of [0.0, 100.0]. Similarly, RGB values may be represented in the range [0.0, 1.0] or also in the range [0.0, 255.0], scaled in preparation for saving into an 8-bit image file. Use the checkboxes to control the way the color values are displayed. It is interesting to note that many over- and under-range RGB values are perfectly normal and legal until they must be quantized to 8-bits for an image file. You can detect these out-of-range colors by looking at the RGB components and checking them against their bounds.
Also note that for both of the LCH models, the hue angle (H) becomes undefined as the chroma value (C) approaches zero.
If you are interested in the equations used by this calculator, you will find most of them here.